Key Points:
- Yes, you can install a roof tarp yourself for temporary emergency roof repair, but prioritize safety, assess damage, and have proper tools.
- Always use safety gear, ensure a stable ladder, and correctly secure your chosen waterproof tarp with battens and adequate overlap.
- DIY roof tarp solutions are temporary; call professionals for structural damage, steep roofs, or extensive repairs to ensure safety.
Installing a roof tarp yourself is possible for many homeowners facing emergency roof damage, but success depends heavily on your physical capabilities, safety awareness, and the severity of the damage. DIY roof tarp installation can provide effective temporary roof repair when done correctly, offering immediate protection against water intrusion while you arrange for permanent repairs.
The decision to tackle this project independently requires an honest assessment of several key factors. Physical requirements include comfortable ladder work, the ability to navigate sloped surfaces, and sufficient strength to handle waterproof tarp materials in potentially windy conditions. Basic roofing knowledge helps ensure proper installation techniques that prevent the tarp from becoming loose or causing additional damage.
Emergency roof covering methods using tarps work best for minor to moderate damage like missing shingles, small punctures, or localized leaks. However, extensive structural damage, large holes, or compromised roof decking typically require immediate professional intervention. Weather conditions also play an important role, and attempting a tarp installation during storms, high winds, or icy conditions creates unnecessary safety risks that outweigh potential benefits.
Essential Safety Precautions Before Starting Your Roof Tarp Project
Safety equipment stands as the most important component when attempting DIY roof tarp installation. Non-slip rubber-soled boots provide essential traction on wet or damaged roofing surfaces, while safety harnesses connected to secure anchor points prevent dangerous falls. Weather conditions must be carefully evaluated before beginning any temporary roof repair work, as wet surfaces, high winds above 15 mph, or approaching storms make tarp installation extremely hazardous.
Property preparation protects valuable assets during the installation process. Cover landscaping, outdoor furniture, and vehicles with plastic sheeting to shield them from falling debris or tools. Clear gutters of leaves and debris to ensure proper water drainage once the waterproof tarp is secured. Remove any loose roofing materials that could shift unexpectedly during installation.
Never attempt emergency roof covering methods alone – have a spotter present at ground level to assist with tools and monitor safety conditions. Check ladder stability on level ground and maintain 3 points of contact while climbing. These preparatory steps significantly reduce accident risks and ensure successful tarp installation that provides reliable protection until permanent repairs can be completed.
Tools and Materials Needed for Effective Roof Tarp Installation
Successful DIY roof tarp installation requires specific tools and materials to ensure proper coverage and secure attachment. Essential equipment includes a sturdy extension ladder rated for your weight plus materials, measuring tape for accurate tarp sizing, a hammer or drill for fastening, and a utility knife for cutting materials. Safety equipment remains non-negotiable: safety harness, non-slip boots, work gloves, and safety glasses protect against common installation hazards.
Many necessary tools for temporary roof repair can be substituted with common household items. Heavy-duty staple guns work when pneumatic nail guns aren’t available, while rope or bungee cords provide alternatives to specialized tie-downs. However, avoid compromising on ladder quality or safety equipment, as these directly impact personal safety during emergency roof covering methods.
Selecting appropriate waterproof tarp materials depends on damage severity and local weather patterns. Heavy-duty polyethylene tarps with reinforced edges offer reliable protection for most situations, while canvas tarps provide superior durability for extended use. Choose tarps at least 3 feet larger than the damaged area on all sides to ensure adequate overlap. Thickness between 6 and 12 mil provides the best balance between flexibility and puncture resistance for roof tarp materials and tools applications.
The Installation Process for Maximum Protection
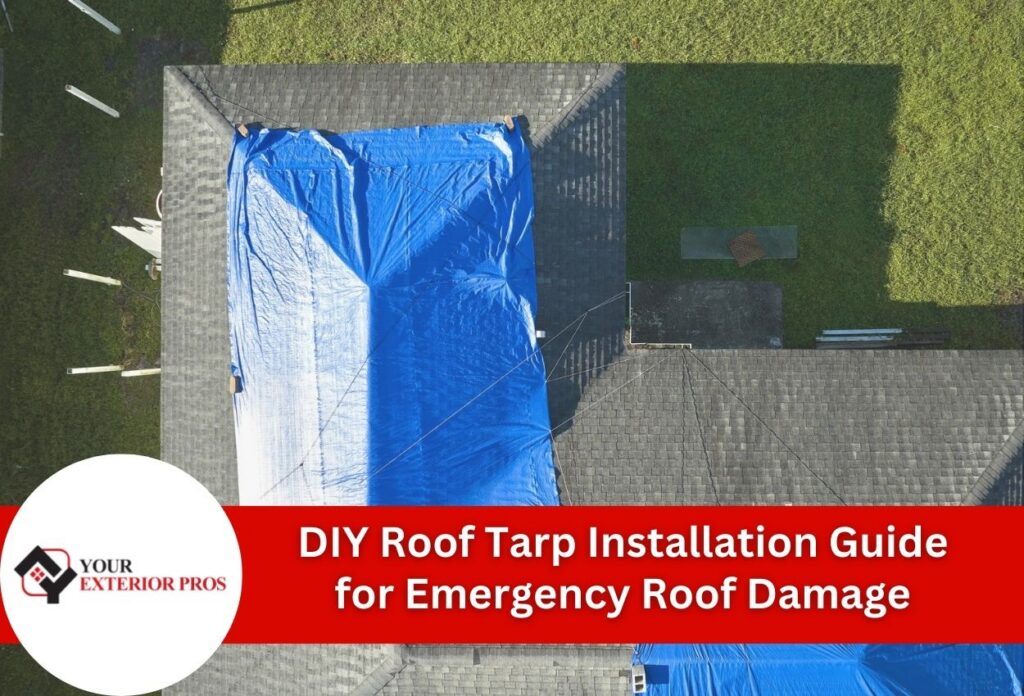
Proper measurement and positioning form the foundation of effective DIY roof tarp installation. Begin by measuring the damaged area from inside the home if possible, then add at least 3 feet on all sides to ensure adequate coverage. This extended coverage allows the waterproof tarp to extend well beyond the damaged zone, creating a watertight barrier that prevents leaks around the repair area. Position the tarp so it runs straight up and over the roof peak when possible, eliminating potential water collection points that could cause leaks or additional damage during temporary roof repair.
Securing techniques require systematic attachment to create reliable weather resistance. Start by attaching wooden strips along the tarp edges using roofing nails or screws spaced every 6 to 8 inches. This sandwich method distributes stress evenly and prevents tearing during high winds. Drive fasteners through both the wooden strip and tarp into solid roof decking, avoiding damaged areas that might not hold securely. Work from the bottom edge upward, maintaining consistent tension without over-stretching the material.
Emergency roof covering methods succeed when proper overlap techniques are followed. Each section should overlap the previous area by at least 6 inches, with all seams running downhill to direct water flow away from vulnerable areas. This systematic approach ensures maximum protection until professional roof tarp materials and tools can provide permanent solutions.
Common Mistakes That Compromise Tarp Effectiveness
Installation errors frequently undermine even well-intentioned DIY roof tarp installation efforts, leading to leaks and potential structural damage. The most common mistake involves inadequate fastening patterns that fail under wind stress. Many homeowners space fasteners too far apart or drive them into damaged roof decking that cannot provide secure attachment points. This creates loose sections that flap violently during storms, eventually tearing free and exposing the damaged area to weather elements.
Poor edge sealing represents another point of failure in temporary roof repair projects. When tarp edges are not properly secured with wooden battens or adequate overlap, wind-driven rain seeps underneath the waterproof tarp material. Water then travels along the surface of the roof, potentially causing damage far from the original problem area. Insufficient tension during installation also creates sagging pockets where water collects, adding weight stress that can tear the tarp or pull fasteners loose.
Sizing and positioning problems frequently leave vulnerable areas exposed or create new damage risks during emergency roof covering methods. Homeowners often underestimate the coverage area needed, selecting tarps that barely extend beyond visible damage. This leaves edges susceptible to wind uplift and leaks. Improper positioning that places seams in water flow paths or fails to account for roof slope direction can channel water directly into the structure, negating the protective benefits of the installation.
How Long Your DIY Roof Tarp Solution Will Last
The lifespan of temporary roof repair installations varies significantly based on tarp material quality and local weather conditions. Heavy-duty polyethylene tarps typically provide reliable protection for 2 to 3 months under normal conditions, while canvas materials may last up to 6 months when properly installed. However, severe weather, including high winds, hail, or extreme temperature fluctuations, can dramatically reduce these timeframes, sometimes requiring replacement within weeks of initial DIY roof tarp installation.
Several factors directly impact durability during emergency roof covering methods. UV exposure gradually breaks down most waterproof tarp materials, causing brittleness and eventual cracking along stress points. Constant wind movement creates friction against fasteners and the surface of the roof, wearing through the material over time. Temperature cycling between hot days and cool nights causes expansion and contraction that loosen fasteners and create stress tears around attachment points.
Warning signs indicate when your temporary solution needs immediate attention before permanent repairs. Visible sagging suggests water pooling or loose fasteners that require tightening or replacement. Small tears or holes around fastener points signal material fatigue that will get worse rapidly without intervention. Loose edges flapping during moderate winds indicate compromised attachment that risks complete failure during the next storm. Regular inspection of roof tarp materials and tools helps identify these issues before they compromise your home’s protection.
When to Call Professionals Despite DIY Capabilities
While DIY roof tarp installation can handle many emergencies, certain damage scenarios exceed safe repair limits for homeowners. Structural damage, including sagging roof decking, compromised rafters, or visible ceiling damage, requires immediate professional assessment before attempting any temporary roof repair. Large holes exceeding 4 feet in diameter create safety hazards during installation and typically need structural support before waterproof tarp materials can provide effective protection.
Steep roof angles above 6/12 pitch dramatically increase fall risks during emergency roof covering methods, making professional installation the safer choice. Multi-story homes or roofs exceeding 20 feet in height also present dangerous working conditions that exceed typical homeowner safety equipment capabilities. Extensive damage covering more than 100 square feet often requires specialized roof tarp materials and tools that professionals can install more efficiently and securely.
Local building codes frequently mandate professional documentation for insurance claims, particularly when damage affects structural elements or exceeds specific square footage thresholds. Many insurance policies require licensed contractor assessments before approving temporary repair expenses, making DIY installations potentially expensive if they don’t meet coverage requirements. Professional installation also ensures compliance with local permit requirements and proper documentation for future permanent repairs, protecting homeowners from potential liability issues or coverage disputes during the claims process.
Need Professional Roof Tarp Installation? Call Your Exterior Pros Today
If you’re unsure about handling a DIY roof tarp installation, it may be time to call in the experts. At Your Exterior Pros, we understand that properly securing a roof tarp is important for protecting your home from further damage. Whether it’s navigating complex roof layouts or ensuring compliance with local building codes, our team is equipped to handle the challenge efficiently and safely.
For immediate assistance and to ensure your home stays safe and dry, call us now at (912) 250-4730. Your Exterior Pros is here to help with all your roofing needs!